The most common failure in vegan deep-fried pickles is The Sloughing Shroud, a catastrophic event where the batter slides off the pickle in one rubbery piece, leaving a “naked” pickle and a pile of greasy dough. This occurs because the lack of egg protein removes the traditional “glue,” causing a total failure of adhesion between the moisture-heavy pickle and the starch. This guide provides a clinical diagnosis of every structural, thermal, and chemical failure point to ensure a permanent bond and a shatter-crisp finish.
What Perfect Vegan Fried Pickles Actually Looks, Feels, and Tastes Like
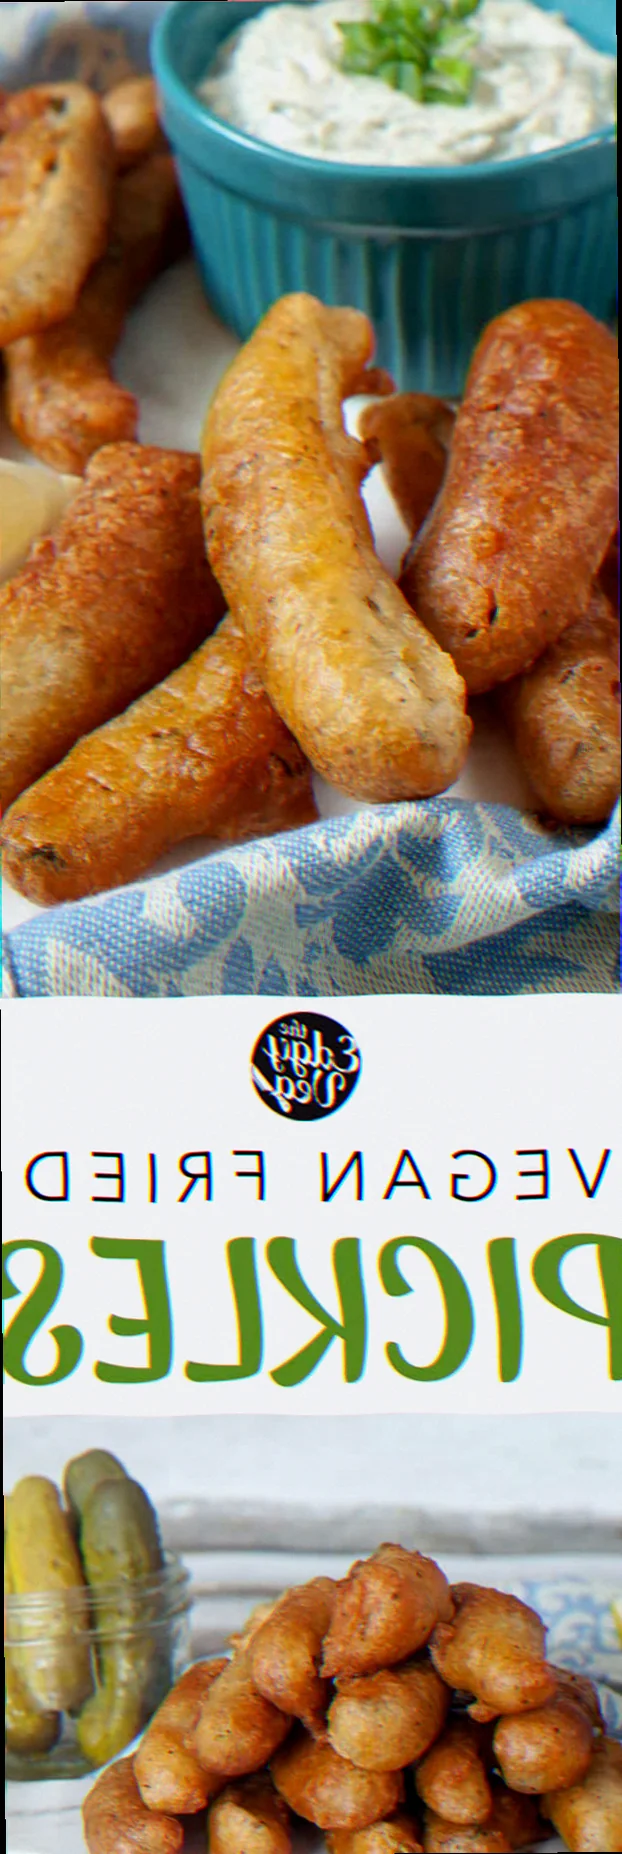
The benchmark for success is a pickle that maintains a structural “snap” while encased in a craggy, aerated crust that shatters upon impact without separating from the fruit.
| Stage | Success marker — what you should see / feel / smell / hear |
|---|---|
| Preparation | Pickles are matte and bone-dry to the touch; no visible brine sheen remains. |
| Batter Consistency | The batter resembles heavy cream; it should coat a spoon and hold a line when a finger is swiped through it. |
| During Frying | Immediate, vigorous bubbling upon entry (185°C / 365°F); the batter puffs outward instantly. |
| Finished Product | A deep golden-brown, “lacy” exterior; the crust does not “give” when pressed with tongs. |
| The Bite | An audible “crunch” followed by a clean break; no “stringy” batter or sliding pickle. |
The Ingredient Failures — Wrong Choices Before You Even Start Cooking
- The Flaccid Foundation: caused by using soft, thin-cut “sandwich stacker” pickles → fix: Use refrigerated, fermented dill spears or thick-cut “half-sour” rounds. Shelf-stable pickles are pasteurized at high heat, destroying the cell structure and leading to a mushy interior after frying.
- The Heavy-Dough Failure: caused by using 100% all-purpose flour → fix: A 60/40 ratio of All-Purpose Flour to Cornstarch or Rice Flour. High-protein flour creates too much gluten, resulting in a bread-like, chewy texture rather than a crisp snap.
- The Flat Crust: caused by using room-temperature tap water or still water → fix: Ice-cold highly carbonated club soda or beer. The CO2 creates micro-bubbles that expand instantly in hot oil, creating the “lace” effect.
- The Flavor Void: caused by failing to season the flour dredge → fix: Incorporate 3g of fine sea salt and 2g of smoked paprika per 100ish grams of flour. Vegan batters lack the richness of egg yolks and require aggressive seasoning to bridge the flavor gap.
The Technique Failures — What Goes Wrong During Cooking
- The Naked Pickle (Adhesion Failure): the batter slides off in the oil → caused by skipping the “Dry Bridge” (dredge) or dredging wet pickles → fix: Pat pickles with paper towels until they are tacky, then toss in dry starch/flour immediately before dipping in wet batter. The dry flour absorbs residual surface moisture, creating a mechanical bond.
- The Grease-Sponge Effect: the pickle is heavy and tastes of pure oil → caused by low oil temperature (below 170°C) or overcrowding the pot → fix: Maintain oil at 185°C (365°F). Use a heavy-bottomed vessel to prevent temperature “swing” when cold pickles are added.
- The Leathery Coating: the batter is tough and dark → caused by over-mixing the wet batter → fix: Whisk the liquid into the dry ingredients until just combined. Lumps are acceptable. Over-whisking develops gluten, which turns the coating into leather.
- The Soggy Bottom: the pickles are crisp on top but mushy underneath within 2 minutes → caused by draining on paper towels → fix: Place finished pickles on a wire cooling rack over a baking sheet. Paper towels trap steam, which re-hydrates the crust from the bottom up.
The Equipment Failures — When Your Tools Are the Problem
- The Guesswork Failure: caused by lack of an Infrared or Probe Thermometer. If the oil is too cold, the pickle oil-logs; if too hot, the outside burns before the “bridge” sets. You must verify 185°C.
- The Steam Trap: caused by using a shallow frying pan with low sides. This allows oil splatter and heat loss. Use a Cast Iron Dutch Oven; the thermal mass of the iron prevents the temperature from plummeting when the cold pickles enter.
- The Tongs Trauma: caused by using blunt-force tongs to move pickles in the oil. This punctures the batter before it sets, letting oil in and juice out. Use a Stainless Steel Spider or Skimmer to gently cradle the pickles.
The Full Recipe — Built Around Preventing Every Failure Above
- Dill Pickle Spears (Cold-Cured) — 500g — [Prevents “Mushy Interior” failure]
- All-Purpose Flour — 150g (Divided) — [The “Adhesion Bridge”]
- Cornstarch or Rice Flour — 60g — [Prevents “Leathery Coating”]
- Ice-Cold Club Soda or Pale Lager — 200ml — [Prevents “Flat Crust” failure]
- Baking Powder — 5g — [Ensures aeration in the absence of egg protein]
- Garlic Powder, Onion Powder, Cayenne — 5g each — [Prevents “Blandness”]
- Neutral High-Smoke Point Oil (Grapeseed or Peanut) — 1 Liter
Method:
- Moisture Extraction: Pat the pickles with surgical precision using lint-free towels. Success marker: Pickles should look dull and feel “tacky,” not slippery.
- The Dry Bridge: Toss the dried pickles in 50g of the AP flour. This prevents The Sloughing Shroud. Success marker: A thin, even white dust over the entire surface.
- The Cold Suspension: Whisk the remaining flour, cornstarch, baking powder, and spices. Pour in the ice-cold liquid and whisk for exactly 15 seconds. Success marker: A batter that looks like thick pancake mix with visible small lumps.
- The Thermal Strike: Heat oil to 185°C (365°F) in a Dutch Oven. This temperature is non-negotiable.
- The Dip and Drop: Dip a floured pickle into the batter, let the excess drip off for 2 seconds, and lower it into the oil away from your body. Do not crowd; fry only 4–5 at a time.
- The Set: Do not touch the pickles for the first 60 seconds. This allows the starch to gelatinize and bond. Success marker: The bubbles around the pickle will slow down slightly as the exterior hardens.
- The Evacuation: Once deep golden (approx. 3–4 minutes), remove with a spider. Success marker: A “clink” sound when the pickle hits the wire rack.
How to Rescue Vegan Fried Pickles When It Has Already Gone Wrong
- If the batter is sliding off (Naked Pickle): Your pickles were too wet or your batter was too thin. Rescue: Whisk 20g more flour into the batter and re-dredge the remaining pickles in cornstarch before dipping. For the ones already fried, there is no fix; serve them as “Deconstructed” and move on.
- If the pickles are dark brown but soggy: Your oil was too hot, burning the outside before the moisture could evaporate. Rescue: Transfer them to a 200°C (400°F) oven on a wire rack for 4 minutes. This “oven-blast” can sometimes force the remaining moisture out of the crust.
- If the batter is “doughy” and thick: You over-mixed or the batter sat too long and the flour hydrated too much. Rescue: Thin the batter with 1 tablespoon of cold club soda. Do not over-whisk; fold it in gently.
Make-Ahead: Which Failures This Introduces and How to Avoid Them
Making fried pickles ahead of time is a recipe for Hydrolytic Sogginess. The salt in the pickle constantly pulls moisture outward, attacking the crust from the inside.
- The Failure: Rubbery, tough crust upon reheating.
- The Prevention: You cannot “hold” these in a fridge. If you must make them 1–2 hours ahead, keep them on a wire rack in a 65°C (150°F) oven with the door slightly ajar. This maintains the thermal energy while allowing steam to escape.
- Reheating Protocol: Never use a microwave. Use an Air Fryer at 190°C (375°F) for 3 minutes. The high-velocity air strips the surface moisture that has accumulated, partially restoring the “shatter” texture.
Related topics: Vegan potato bake recipe · Best vegan cupcake recipe ever · Vegan poppy seed cake recipe
Diagnostic FAQ
My pickles turned out greasy and limp — what went wrong?
This is Thermal Sag. Your oil dropped below 170°C when you added the pickles. Use a thermometer and fry in smaller batches to ensure the oil stays in the “searing” range.
The crust looks like a smooth shell rather than craggy — why?
This is a Carbonation Failure. Either your club soda was flat, or it was too warm. The “crag” comes from the violent expansion of cold gas hitting hot oil. Use a fresh, unopened can of soda or beer, chilled in the freezer for 15 minutes before mixing.
The batter tastes “dusty” or like raw flour — where did I go wrong?
This is Under-Cooking. The exterior looked brown, but the starch granules in the center of the batter didn’t reach the “gelatinization” point. Lower your heat to 175°C and cook for 1 minute longer to ensure the heat penetrates the full thickness of the crust.